Unreal 5 Blueprints (Hello World)

Epic Games recently released Unreal Engine 5 and I thought it was time that I wrote a series about using Blueprints to show the power of UE5. In this series of posts, I am going to start from basics, introducing you to Blueprints and then build us up to using Blueprint to create our own games.

What I’m not going to do is recap how to install Unreal. I have seen a lot of Unreal tutorials where the first twenty minutes detail the download and installation process, unnecessarily repeating Epic Games content. You can get the download here and follow the instructions in the video about installing Unreal.

Note: You will require an Epic Games account to install Unreal.

What are Blueprints?

Unreal Engine has a visual scripting system called Blueprints. This is a system that allows us to use something called a node-based interface to create and configure gameplay elements.

Blueprint example showing multiple nodes.

These nodes allow us to do things such as raise and react to events, use variables, or perform actions.

Getting started

Once you have Unreal installed, you launch it from the Epic Games browser so open that up and click the Launch button to open Unreal.

Launch button being displayed in the Epic Games browser.

Note: The button is a drop-down because it is possible to have different versions installed.

Once Unreal has started, you will see the Unreal Project Browser. From here, you can either open an existing project or you can create a new one. Click the Games image to open the games options up.

New project window

In honour of all good programming tutorials, we will start off with a Hello World project so let’s change the project name to HelloWorld.

We can choose from a number of different templates such as creating a blank project, a third-person shooter and so on. The different choices give us some different default operations such as a player character in the case of a FPS. For the moment, we are going to choose a blank template.

I’m going to leave all the other options the same. The Blueprint button simply means that we initially want to create our project as a Blueprint project rather than a C++ one. It is possible to add Blueprint to a C++ project, and C++ to a Blueprint project if we need to, later on. The Starter Content gives us some initial content so that we have something to view. I have unchecked this because I want to start completely fresh.

Click Create and the project is created. It may take a few seconds, there’s nothing to worry about if there is a slight delay. Even though we said we wanted no content, the project will have a landscape and some lighting already created for us.
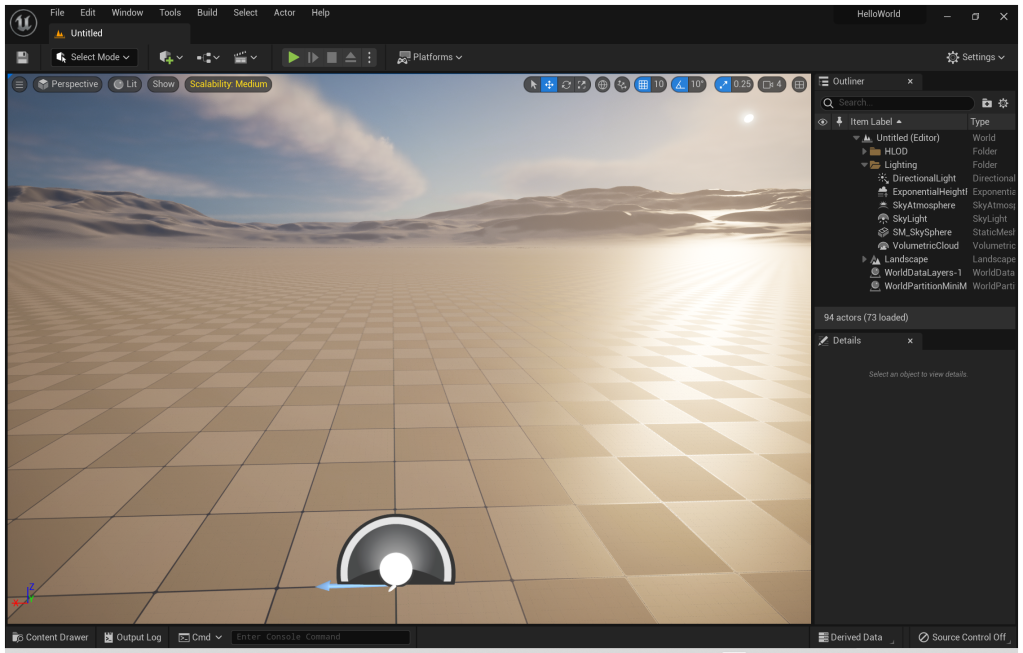
At this stage, most tutorials I have looked at spend time covering all of the windows that make up the editor. Rather than doing that, I will introduce windows as we encounter them.

Navigation in the Viewport

The main area of the window, the part showing the landscape, is known as the Viewport. By default, Unreal opens the perspective viewport. In later tutorials, we will look at how to use different viewport configurations for more fine-grained control of models.

If you hold down your left mouse button and move the mouse, the image in the viewport rotates in the appropriate direction. You can use the arrows to zoom in or out, as well as to shift the viewport left or right.

Before we make any changes, we should save our level. To do this, choose Save Current Level As... from the File menu.
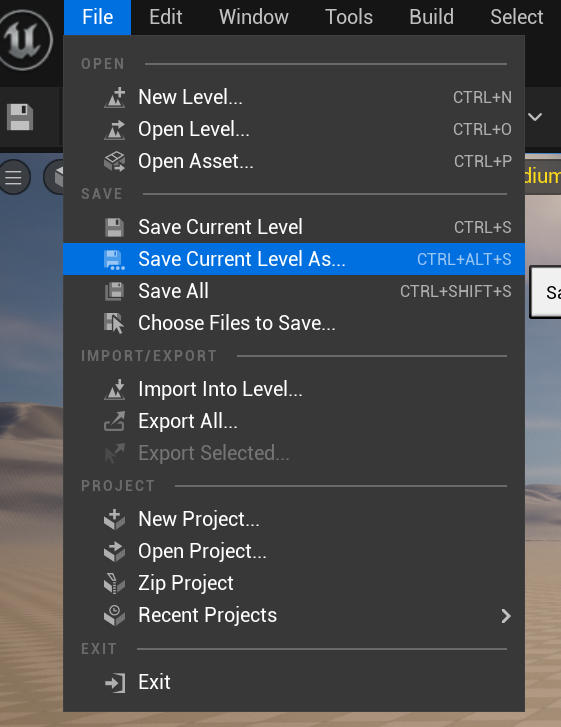
Save Current Level As...

When you do this, you will be prompted to save the level. I named my level Earth.

Save level dialog.

Adding content

Before I add my own content to this project, I want to remove most of the default content that was added when the project was created. On the right-hand side of the screen, there is an Outliner tab that contains a reference to every item that has been added. I am going to get rid of most of the visible items so I select the following items in the Outliner (click the Delete button on your keyboard to delete them). To remove all of the landscape items, you will have to expand the landscape folder.

Removing items from the viewport.

If you were wondering why we didn’t remove the contents from the HLOD folder, this is because these are items that were automatically created by Unreal to improve runtime performance. They do this by replacing separate meshes with single elements that can be rendered in the distance. The entries here were created from the landscape elements, and were designed to reduce the amount of detail that Unreal has to render at long distances. When we build this level, they will be automatically removed for us because the landscape elements they were based on have been removed.

As soon as you have removed the elements, make sure to save the project. You can use the File menu and click Save All, or you can use the shortcut of clicking Ctrl + Shift + S.

Making our world

I did promise that we would do a Hello World exercise and, true to my word, the world we are going to “do” is Earth. For the purposes of this tutorial, I am going to download the “2K Earth daymap” image to use on the sphere so go ahead and download the image from here.

Adding the Earth texture is straightforward. Click the Content Drawer at the bottom of the screen.

Content Drawer button.

The content browser window is displayed and we are going to click Import to start the process of importing the world image.

The content window, ready to import content.

Select the world image in the file dialog and this loads the map into the project as a texture.

The 2K earth map added as a texture

While we have loaded the Earth texture, we want to convert this into a material that we can use when we want to render our final Earth out. Right-click on the texture in the content browser and choose Create Material from the context menu.

Save the project to make sure no work has been lost, then build the levels by selecting the Build menu and then clicking Build All Levels.

Build all levels

Unreal will prompt us to ask what operation we want to perform at this point. I am going to choose to delete the HLOD entries:

Build HLODs entry

Make sure that all of the content is selected in the Save Content dialog and click Save Selected.

Save Content dialog

Depending on the power of your machine, the Build process may take a little while. Please be patient while it performs the build.

Productivity Hint: As we work with Unreal, we will spend a lot of time in the content browser window. If you want the browser always available, you can add the content browser as a docked item on your page. To do this, choose the Content Browser option from the Window menu.

The content browser window.

We have one final thing we want to do before we start creating our Blueprint. I want to add the Earth material onto a sphere, which means that I want to add a sphere onto the screen. I am going to switch the viewport into modeling mode. In the toolbar, I click the Select Mode dropdown and choose Modeling from the list of available options.
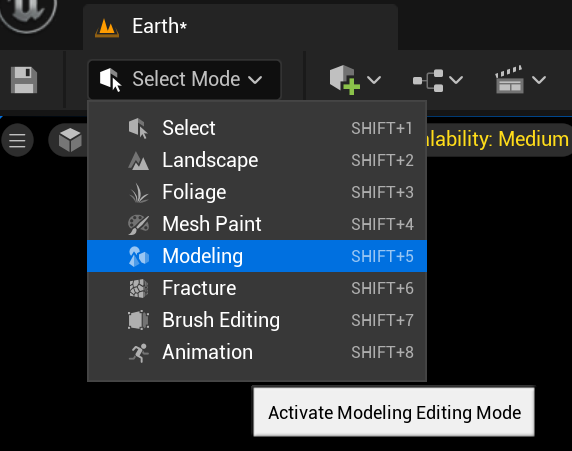
Switch the viewport into modelling mode.

The left hand side of the screen shows me a vertical toolbar containing the model operations I can perform with a modeling pane beside it. Choose the Sphere in the Shapes section.
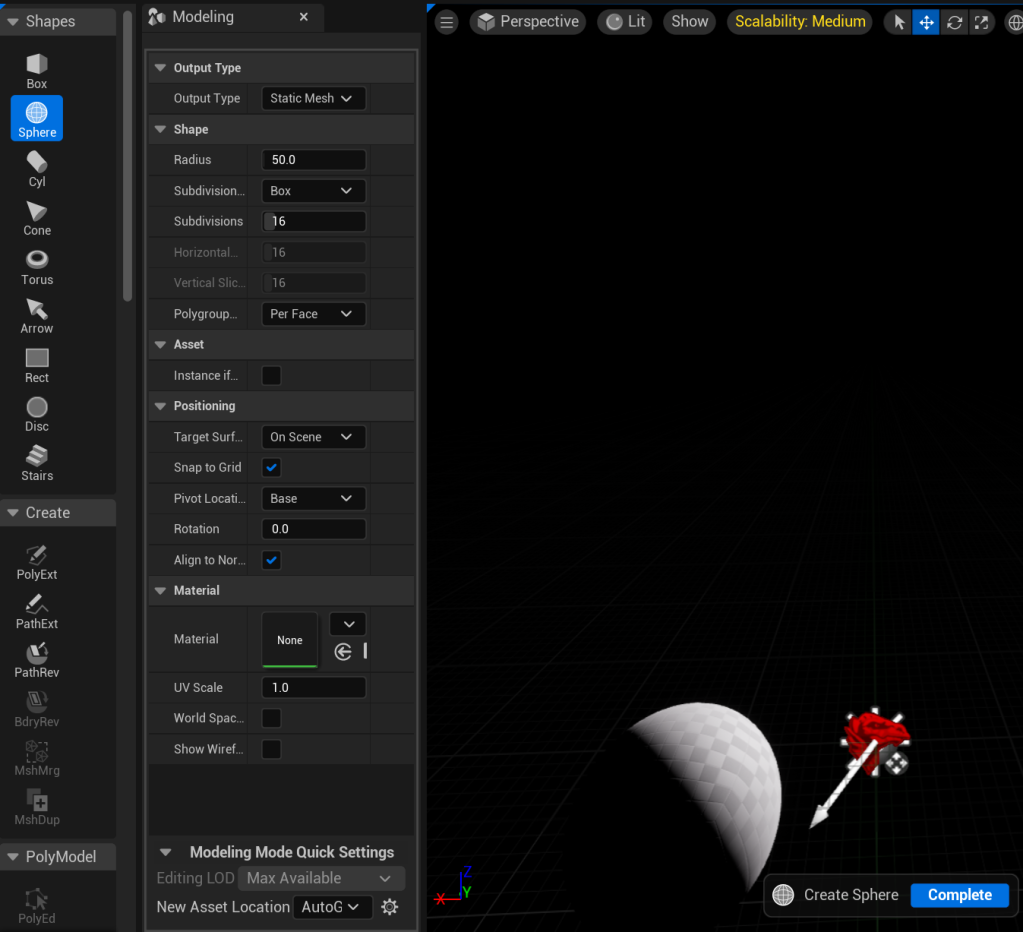
Adding a sphere to the viewport.

Left-click anywhere in the viewport to finish adding the sphere, then click the Complete button. If you don’t click Complete, Unreal lets you add more spheres. Don’t forget to save your work.

Adding blueprints

We are building a world, so it would be a good idea for our world to rotate. What’s the point of having a sphere if we can’t see all sides of it?

We are going to open the blueprint editor, using the Blueprint button in the toolbar.

The blueprint button expanded in the toolbar.

Note: Every level you create has a blueprint already associated with it. You cannot create a new level blueprint, you can just interact with the one that is already there.

As we are going to create a blueprint for our rotating planet, we click the New Empty Blueprint Class... option in the menu. In future tutorials, I will show other ways to create blueprints. What we should see now is a dialog that allows us to select the parent class.

Pick Parent Class dialog

At this point, it is worth pointing out that a blueprint class (we shorten it to blueprint), is just an asset that we can use to add functionality. These build on top of existing gameplay classes, so they inherit features of those classes and allow us to override them to add functionality and abilities that are specific to our needs. This should lead you to understand what we are going to pick here is the base functionality that we are going to use, so this will be the parent of our blueprint. As we are going to be working with an object that can be placed in the level, we are going to choose Actor as our parent class. A dialog will pop up asking us to name our blueprint. For this example, I have chosen RotatingEarth as the name.

Create new Blueprint dialog.

The Blueprint editor will now be displayed. This is a separate window, so you can move it to another monitor while you are working. Again, I’m not going to explain the different parts of this window. In future tutorials, we will delve into the different parts as we need them.

Blueprint editor window

I am going to start this blueprint by adding the sphere into my blueprint. This is the thing I want to rotate, so it is the thing that needs to be added. To do this, I am going to click the Add button and select the Static Mesh option from the dropdown. This will let me add the mesh I want to rotate.

Add Static Mesh

To add the rotation capability, I click Add again but this time, I am going to search for Rotating Movement.

Searching for Rotating Movement

I now have two components added to my blueprint. Something I haven’t done yet is add my sphere to the static mesh. Click on the StaticMesh in the Components window and the details for the component will appear in the Details view. In the Static Mesh, click the dropdown with None in it (I’ve highlighted it in red below).

The sphere mesh will have a random name, but as it is the only one in my level, it is easy to identify.
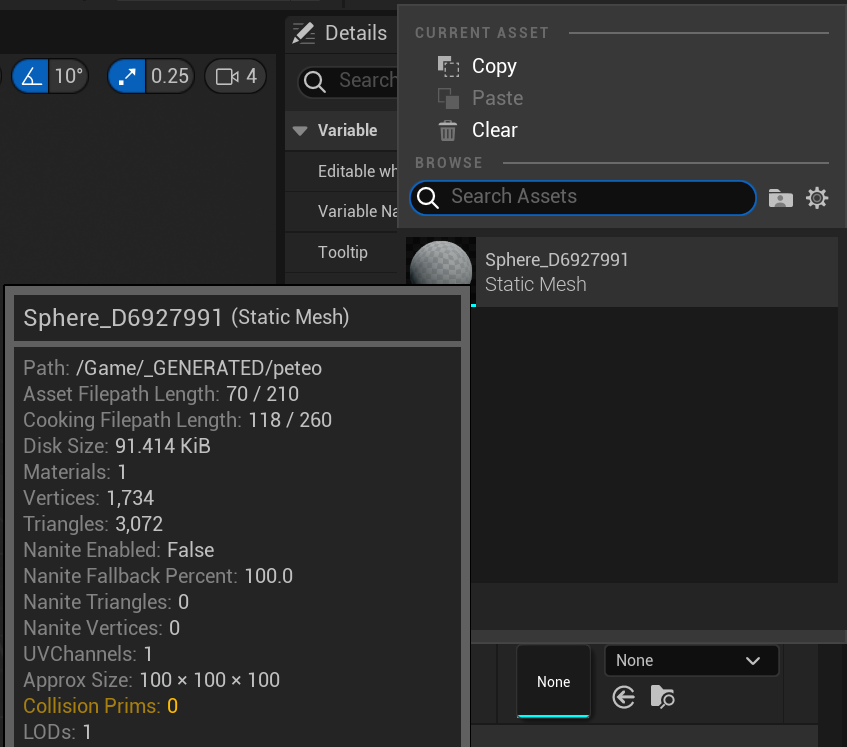
Add my sphere mesh.

In the Materials section immediately below, select the None dropdown and choose the material we created in the section above.

Adding the Earth material.

Before we can add our rotating earth, we need to compile our Blueprint so that it will be usable. Click the Compile button in the toolbar.
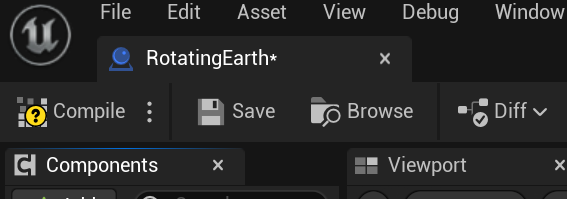
Compiling our asset ready for use.

After compiling the Blueprint, close the Blueprint editor window and save your work.

Note: If you close Unreal and open it again, you may still see default content. If you do, this means that the Earth level isn’t open, so you need to open it using File > Open Level to open the level editor, where you can select the Earth level.

The final steps

Even though we added a rotating Earth Blueprint using the Sphere mesh we added, you will see that the sphere in the viewport doesn’t look to be a rotating Earth. To fix this, we start by doing something that we might consider to be counterproductive. Select the sphere mesh either by clicking on it in the viewport, or in the outliner, and delete it.

Adding the rotating planet is a simple matter of showing the content browser using the Content Drawer if you don’t have the browser docked in your editor. Click the Blueprints folder to show the rotating Earth.

Rotating Earth blueprint shown in the content browser.

Select the RotatingEarth actor and drag it into the viewport.

Rotating Earth added to the viewport.
All that’s left for us to do is save our progress and select the Build All Levels command in the Build menu. The same build screens will appear that we saw earlier in this tutorial.
The Build All Levels option in the Build menu.

You’re ready to test the level, so click the play button in the toolbar, then use the mouse and W, A, S and D keys to move around in the viewport.

The play button in the toolbar.

Note: I know that the earth texture doesn’t look quite right. There are steps that we would normally take to work with meshes and spheres that we haven’t undertaken in this tutorial. In a future tutorial, we will look at how to properly texture spheres.

I hope you enjoyed this tutorial. This is the first in a long series I have planned. Those who have read who are worried I won’t be continuing with my series on TypeScript, please don’t worry. I’m still continuing with those tutorials as well.

I have added the repository for this tutorial to Github. Any questions, please feel free to ask in the comments.

100 Days of TypeScript (Day 10)

In the previous article, I started describing how I had built a more complex TypeScript web application that retrieves data from a separate API and displays the data in a relatively visually pleasing manner. We saw how we could name interface elements to cope with more complicated names, as well as introduce index signatures. Finally, we looked at how we could use the fetch API to retrieve data from the remote site, paying attention to the use of the Promise type to cope with asynchronous code.

In this article, we are going to finish breaking the application down. The code for the application can be found here.

Building the view

In the last article, we laid the groundwork for creating a table that would be populated at runtime. As a recap, our table is built up like this.

<table class="table table-striped">
    <thead class="table-dark">
        <tr>
            <th scope="col">Time</th>
            <th scope="col">Open</th>
            <th scope="col">High</th>
            <th scope="col">Low</th>
            <th scope="col">Close</th>
            <th scope="col">Volume</th>
        </tr>
    </thead>
    <tbody id="trading-table-body"></tbody>
</table>

The way that I am going to populate the table is to create a separate View class that is responsible purely for adding the rows into the column.

The first method I want to cover here is the one that actually adds a row and populates the cells.

private addTableRow(tableBody: HTMLTableSectionElement, ...elements: string[]): void {
    const tableRow = tableBody.insertRow(tableBody.rows.length);
    elements.forEach(element => {
        const columnElement = tableRow.insertCell(tableRow.cells.length);
        columnElement.textContent = element;
    });
}

This method accepts an instance of an HTMLTableSectionElement. This is a roundabout way of saying it takes the table body as the area we are going to add a row onto. I am going to pass the items we want to display in each cell in a row using the spread operator (...elements: string[]).

Now that I have everything I need to add the rows, I am going to add a row to my table body using the insertRow function. This method does exactly what it says, it inserts a row at a certain index so it is tempting to think that there would also be an addRow function to add a row at the end of the table body. While it might be tempting, the reality is, there is only an insertRow function so, to add the row at the end, we have to insert the row using the number of rows we already have, using tableBody.rows.length, as the guide where to put the row.

I now need to add each element in as a cell. To add a cell, I follow a similar pattern to the row using insertCell. I set the textContent to the relevant element and this will be displayed when the row is rendered in the able.

Having created the code I need to add a row to the table, I need a method that will take the output from the trading API and call the addTableRow method.

Build(shareDetails: Trading): void {
    const tableBody = document.getElementById('trading-table-body') as HTMLTableSectionElement;
    Object.entries(shareDetails['Time Series (5min)']).forEach(([date, timeSeries]) => {
        this.addTableRow(tableBody, date, timeSeries['1. open'], 
            timeSeries['2. high'], 
            timeSeries['3. low'], 
            timeSeries['4. close'],
            timeSeries['5. volume']);
    });
}

The first part of this method should be apparent by now. I get the HTML element that has the id trading-table-body and cast it to an HTMLTableSectionElement (this is what a tbody is in TypeScript). I’m going to use something new here to get the entries out of the API. If you remember, from the last article, each trading element is given a unique name. In order to iterate over these entries, I need to use the Object.entries operation which returns an array of key/value pairs from the object. The key/value pairs are used in the forEach function and are represented a bit like this ([key, value]). In my forEach, I have tried to be a bit more meaningful and use descriptive names date and timeSeries to represent the key and value. With this capability, I can call the addTableRow method, passing in the table body, the date, and the time-series values.

This is time for a confession. In my first iteration of the code for this article, I put the id on the table itself. This meant that the code I was writing to populate the table became more convoluted than it needed to be because I had to get the table body after I got the table. This was an unnecessary step that was easily eliminated by moving the id onto the tbody element.

If you were trying to write this code, from scratch, and you were just using the default tsconfig.json file, you would not be able to use the Object.entries option. To use this capability, you need to add a minimum of ES2017 in your lib entry.

A brief journey into tsconfig.json

In the last article, and this one, I have mentioned changes that need to be made to tsconfig in order for the code to build. As I have said previously, the tsconfig file controls how the code is built, and what it looks like. It is time to take a look at the tsconfig file for this code to see what effect it has on the build operations.

{
  "compilerOptions": {
      "target": "es2017",
      "module": "amd",
      "removeComments": true,
      "noImplicitAny": true,
      "lib": [
          "es2017",
          "dom"
      ],
      "outDir": "./scripts",
  }
}

Starting at the bottom, outDir tells TypeScript where it will write the output js files to. The lib entry tells TypeScript what libraries to load to compile the code. As I am making use of Output.entries and HTML elements such as HTMLTableSectionElement, I have to add the es2017 and dom libraries.

One of the strengths of TypeScript is that it is a great support to you when you want to use types. By setting noImplicitAny, I tell TypeScript that I want to be warned if I have code that it thinks can be of type any because I forgot to put the type in. Why use a type system if you are just going to ignore it?

Depending on the complexity of the system I am working on, I may have comments in my codebase. I do not want these to be added to the compiled code because that wastes bytes when I am serving up the JavaScript. I love the fact that removeComments helps me here.

I’m going to skip to the top of the file for the moment. The target entry is fascinating. What it does is tells TypeScript what version of JavaScript support should be used. This affects the output of the code because it allows us to write code that uses the latest language features and then writes the corresponding JavaScript that would apply at the target version. The reason for this is because TypeScript is often ahead of features that are either being proposed for a future version of JavaScript or which have been adopted, but haven’t been implemented in the major browsers. Obviously, if all the browsers support the features of your code, then there is no need to use workarounds. The easiest way to visualise this is to change the target to es5 and then recompile the code. This is the output.

define(["require", "exports"], function (require, exports) {
    "use strict";
    Object.defineProperty(exports, "__esModule", { value: true });
    exports.View = void 0;
    var View = (function () {
        function View() {
        }
        View.prototype.Build = function (shareDetails) {
            var _this = this;
            var tableBody = document.getElementById('trading-table-body');
            Object.entries(shareDetails['Time Series (5min)']).forEach(function (_a) {
                var date = _a[0], timeSeries = _a[1];
                _this.addTableRow(tableBody, date, timeSeries['1. open'], timeSeries['2. high'], timeSeries['3. low'], timeSeries['4. close'], timeSeries['5. volume']);
            });
        };
        View.prototype.addTableRow = function (tableBody) {
            var elements = [];
            for (var _i = 1; _i < arguments.length; _i++) {
                elements[_i - 1] = arguments[_i];
            }
            var tableRow = tableBody.insertRow(tableBody.rows.length);
            elements.forEach(function (element) {
                var columnElement = tableRow.insertCell(tableRow.cells.length);
                columnElement.textContent = element;
            });
        };
        return View;
    }());
    exports.View = View;
});

This is a lot of code, and a lot of workaround for features that were added in later versions of JavaScript. If I change the target back to ES2017, this is what the code looks like.

define(["require", "exports"], function (require, exports) {
    "use strict";
    Object.defineProperty(exports, "__esModule", { value: true });
    exports.View = void 0;
    class View {
        Build(shareDetails) {
            const tableBody = document.getElementById('trading-table-body');
            Object.entries(shareDetails['Time Series (5min)']).forEach(([date, timeSeries]) => {
                this.addTableRow(tableBody, date, timeSeries['1. open'], timeSeries['2. high'], timeSeries['3. low'], timeSeries['4. close'], timeSeries['5. volume']);
            });
        }
        addTableRow(tableBody, ...elements) {
            const tableRow = tableBody.insertRow(tableBody.rows.length);
            elements.forEach(element => {
                const columnElement = tableRow.insertCell(0);
                columnElement.textContent = element;
                tableRow.appendChild(columnElement);
            });
        }
    }
    exports.View = View;
});

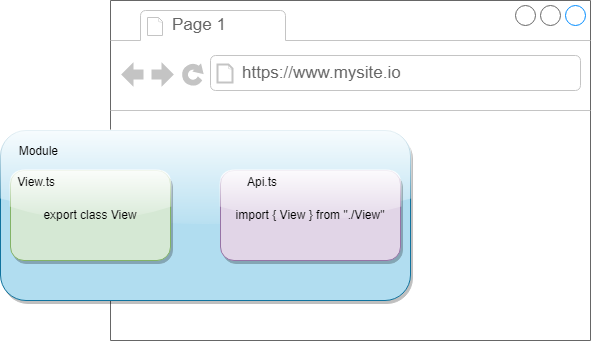
The final bit of the config file is the module we are using. We can think of a module as simply a collection of files that are linked and that we can use in our code. Any items we export in our code can be used in other parts of our codebase so, as we want our View to be usable in other files in our codebase, it is exported in View.ts. The following picture shows the relationship here, with the browser not having to care about the individual files as TypeScript will have taken care of the relationship.

Image showing module with exported and imported class, and browser accessing the module.

The reason we set the module to AMD is that we want to produce that can be loaded using RequireJS. If we didn’t do this, when we loaded our page we would get this error. Uncaught ReferenceError: exports is not defined. Okay, that seems a little bit confusing so let’s go step by step.

  1. We want to load multiple scripts so we are going to use a module.
  2. If I set my script tag in HTML to this: <script src="scripts/api.js"></script>, I get the error Uncaught ReferenceError: define is not defined in the console.
  3. If I set my script tag to this: <script type="module" src="scripts/api.js"></script> and browse to my file locally, I get the error Access to script at 'file:///…/scripts/api.js' from origin 'null' has been blocked by CORS policy: Cross origin requests are only supported for protocol schemes: http, data, chrome-extension, edge, https, chrome-untrusted.
  4. If I use something like live-server to load my page as a hosted page, I get the following error Uncaught ReferenceError: exports is not defined.
  5. In order to load the multiple scripts, I need to use RequireJS, so my module has to be AMD. My HTML script tag now looks like this: <script src="https://cdnjs.cloudflare.com/ajax/libs/require.js/2.3.6/require.min.js" data-main="scripts/api"></script>. With an AMD module, this works perfectly.

Bringing it all together

I have the code to get data from the API. I have code to display it in a table. All I need now is code to bring the two parts together. In the script, I refer to an api file, which contains the calls I want to make to my api and then bind to the display. This file is, cunningly enough, called api.ts. It doesn’t contain a class, simply relying on a couple of function calls to make everything work together.

The way that I am going to start my code here is to create instances of the View and Intraday classes.

import { Intraday } from "./Intraday";
import { Trading } from "./Models/Trading";
import { View } from "./View";
const view = new View();
const intraday = new Intraday();

Things get a little bit more interesting at that point. If you remember, from the last article, the Get method is an asynchronous method, returning a Promise. The code for a Promise can be a little bit awkward so what I want to do is use a different way of working with promises. There is a feature called async/await that gives us the same capability as doing Promise().then(). Let’s look at what our code looks like using async/await.

async function RefreshView(symbol: string): Promise<void> {
    const shareDetails = await intraday.Get(symbol) as Trading;
    view.Build(shareDetails);
}

In order to say I want this piece of code to be asynchronous, I use the async keyword. Any async function returns a Promise because this is just wrapping up a promise. Having said that my code is going to be asynchronous, I use await to say that I want to wait for the Get call to finish before continuing on to the Build call. If you think back to the description of promises, you can see that the code that comes after the await is the code inside the then part of the promise.

Finally, I need a piece of code to call RefreshView. As the function is asynchronous, I am going to use the then block to update the loading state header to say that the data has been loaded.

RefreshView('MSFT').then(x => {
    const state = document.getElementById("loading-state") as HTMLHeadingElement;
    state.textContent = `Data loaded for MSFT`;
});

You might wonder why I didn’t use the following code to refresh the view.

await RefreshView('MSFT')
const state = document.getElementById("loading-state") as HTMLHeadingElement;
state.textContent = `Data loaded for MSFT`;

The reason I use the promise format rather than the async version is because of the module we are using. As we have set the module to amd, we would get the error Top-level 'await' expressions are only allowed when the 'module' option is set to 'esnext' or 'system', and the 'target' option is set to 'es2017' or higher. With this minor limitation in mind, the simple promise format is enough for me.

Conclusion

There has been a lot to take in, in this article. We have covered changes to tsconfig and how to use async features of the language, as well as looking at how to dynamically add entries into tables. The next post sees us adding additional TypeScript language features into our arsenal.

100 Days of TypeScript (Day 9)

If you have been following along on our journey so far, I have been going through the building blocks of TypeScript development. On Day 8, I touched on TypeScript working with web pages. At the end, I promised that I would move onto a more complex application, one that retrieved data via HTTP requests, and worked with that. In this post, I am going to cover a lot of ground and build out a fully-featured application that retrieves Intraday trading prices for Microsoft and displays them in a table.

To make things more interesting, I am going to introduce styling the application with Bootstrap to make it more visually interesting. The following screenshot gives an indication of what our application will look like when we have finished.

Intraday trading table example, demonstrating what we will be building in this post.

The web page

I am going to put the HTML for the full page here, rather than building it up section by section.

<!DOCTYPE html>
<head>
    <title>100 Days of TypeScript - Day 9</title>
    <link href="https://cdn.jsdelivr.net/npm/bootstrap@5.0.2/dist/css/bootstrap.min.css" rel="stylesheet" integrity="sha384-EVSTQN3/azprG1Anm3QDgpJLIm9Nao0Yz1ztcQTwFspd3yD65VohhpuuCOmLASjC" crossorigin="anonymous">
</head>
<body>
    <h1>Intraday Trading</h1>
    <h2 id="loading-state">Loading data for MSFT</h2>
    <table class="table table-striped">
        <thead class="table-dark">
            <tr>
                <th scope="col">Time</th>
                <th scope="col">Open</th>
                <th scope="col">High</th>
                <th scope="col">Low</th>
                <th scope="col">Close</th>
                <th scope="col">Volume</th>
            </tr>
        </thead>
        <tbody id="trading-table-body"></tbody>
    </table>
    <script src="https://cdn.jsdelivr.net/npm/bootstrap@5.0.2/dist/js/bootstrap.bundle.min.js" integrity="sha384-MrcW6ZMFYlzcLA8Nl+NtUVF0sA7MsXsP1UyJoMp4YLEuNSfAP+JcXn/tWtIaxVXM" crossorigin="anonymous"></script>
    <script src="https://cdnjs.cloudflare.com/ajax/libs/require.js/2.3.6/require.min.js" data-main="scripts/api"></script>
</body>

The header for the page should be largely familiar. What is different here is that I have linked out to something called a Content Delivery Network (CDN) to provide the Bootstrap stylesheets. Basically, Bootstrap uses stylesheets and JavaScript to control how we see content on the screen. We could store the CSS and JavaScript files locally in our project and reference them from there or we could use a centrally stored location for these files, which would be the CDN.

In the body of the page, I add a couple of headers and a table. The h2 element is given an id because we are going to update this once the page has loaded the data.

Before we get to the table, we have a couple of scripts that are being loaded in. The first script is the JavaScript that goes along with the Bootstrap; again, this is being pulled in from a CDN. The second script is something new for us. I have broken the underlying functionality into separate TypeScript files, which has implications on how they are loaded into the browser. I am using requires.js to manage the loading of these files for me. The data-main section tells requires which script should be loaded first.

When I break the back-end code down, I will show you how I organised the TypeScript so that it created a module that was suitable for requires.js.

Getting to the table, I told Bootstrap that I wanted the table formatted as a table with striped alternate rows. I did this by adding class="table table-striped". The table body has been given an id because we are going to be interacting with it in our TypeScript.

The Intraday API

I am going to be using the trading information from Alphavantage. This allows people to get a free API key to interact with their various share APIs. The API that I will be using is intraday trading. Go ahead and have a look at the results from calling this API, it helps to give a response that looks a little bit like this.

Response from calling the Alphavantage intraday trading API.

You can probably guess that I want to map the results from this API call into TypeScript, but the JSON looks a bit interesting. The actual keys that we want to map look a lot different to what we might have typically seen in the past so mapping the metadata, for instance, means that our keys would have to look different. If you have developed applications in other languages, you would probably expect that we would have to map the name of the key onto a standard TypeScript name. In other languages, this would typically look like this.

[DataMember("1. open")]
public string Open { get; set; }

TypeScript doesn’t work like this. Instead, we can actually use the key as the name. What this means is we can create our MetaData type like this.

export interface MetaData {
    '1. Information': string;
    '2. Symbol': string;
    '3. Last Refreshed': Date;
    '4. Output Size': string;
    '5. Time Zone': string;
};

Unsurprisingly, we can do the same with our time series.

export interface TimeSeries {
    '1. open': string;
    '2. high': string;
    '3. low': string;
    '4. close': string;
    '5. volume': string;
}

In the Alphavantage API, we saw that the key for the time series was not fixed, instead it is a date. The question is, how would we model a key that has an unknown value like this? The answer is to use a TypeScript feature called an index signature. What an index signature does is tell us that you will have an object of an unknown structure, but you know the key and the value types. If we know that we have a string key that contains a time series, we model is using the syntax.

[key: string]: TimeSeries

The name of the key isn’t magic. We could call it whatever we want, TypeScript doesn’t really care.

With this in mind, our intraday trading interface looks like this.

import { MetaData } from "./Metadata";
import { TimeSeries } from "./TimeSeries";

export interface Trading {
    'Meta Data': MetaData;
    'Time Series (5min)': { [key: string]: TimeSeries };
}

We have now modelled the Alphavantage API. I appreciate that the interfaces look a bit weird, but they are exactly what we need when we call the API from our code. If you are wondering why the key is a string and not a date, this is because index signatures limit the acceptable types they can use and Date is not one of those types.

Sidenote: I have added each interface into its own file, with the name of the file matching the name of the interface.

Calling the API

Now we come to the fun part, I have reached the point where I want to be able to call the API. To call an API, I am going to use the fetch command. What fetch gives us is the ability to make requests across the network and get responses back. There are a few things we are going to have to learn about this command, so let’s look at its usage in our codebase. (This code appears in the Intraday class).

public Get(symbol: string): Promise<Trading> {
    return fetch(this.apiSource + symbol).then(resp => {
        return resp.json();
    });
}

Note: Before I break down what is going on in this function, in order to use the fetch capability, we need to add DOM to our lib section in the tsconfig file. The reason we have to do this is because this is available as a browser operation, so needs to make use of DOM operations.

The fetch operation is something that we call asynchronous. This is a fancy term that means that the operation doesn’t block us from doing something else while we wait for the result of the intraday trading call coming in. What this means to us is that we don’t return a Trading object directly out of our method. Instead, we return a Promise that we will have a Trading object at some point. A Promise is our way of telling our code that we will return a particular operation at some point in the future. You will notice that we have a return operation inside the Get call. This is the point that we fulfil our promise.

Okay, so we know what a Promise is, and we know that the fetch call is asynchronous. The contents of our call here is the endpoint that we want to call, with the symbol added to it. I am going to come back to this in a minute when I show what this class looks like in its entirety. Before I do that, I need to address how we fulfil the Promise. When the fetch call returns, it returns a promise containing a Response object. We use the then method to return the json from the response to the get call. What this means to us is, following a successful API call (as designated by a HTTP response status of 200), we decode this response back into our type from the json body of the response.

Where do we get our API address from? Well, I populate this in the constructor like so.

import { alphavantage } from "./Configuration/apiKey";
import { Trading } from "./Models/Trading";

export class Intraday {
    constructor(private apiSource = 'https://www.alphavantage.co/query?function=TIME_SERIES_INTRADAY&interval=5min&apikey=' + alphavantage() + '&symbol=') { }

    public Get(symbol: string): Promise<Trading> {
        return fetch(this.apiSource + symbol).then(resp => {
            return resp.json();
        });
    }
}

Before we close this section off, there is one last piece of the puzzle I need to add in. In the repository, you will see that the apiKey entry is missing from Configuration. The reason for this is that I did not want to check in my Alphavantage API key. You will need to add the following function (replading demo with your own API key), in a Configuration/apiKey.ts file in the code.

export function alphavantage() {
    return 'demo';
}

Conclusion to day 9

I appreciate that there is a lot to get to grips with in this post. In Day 10, I will continue to deconstruct this application and detail other ways of handling asynchronous code in TypeScript. I will also show how we can read the index signature by adjusting our TypeScript libraries.

If you want a sneak peak at what the code looks like, you can find the code on Github.

100 Days of TypeScript (Day 8)

At the end of the last article, I said that we were going to start looking at working with TypeScript on web pages. In this post, we are going to create a simple web-based calculator that shows how we can let TypeScript interact with the contents of a web page. While developing the code, I want to show how we can use “old-school” JavaScript style functions in TypeScript.

As always, the code for this article is available on GitHub.

The design

I want to constrain the input to the calculator so that button presses are limited to a set of well-known inputs. Basically, I want each button to either trigger a number or an operator of some description. In order to choose which operators we are going to work with, I have decided to create a TypeScript file called calculator.ts and add an Operator enumeration to it. I have added this file to the root of my solution.

enum Operator {
    add = '+',
    subtract = '-',
    multiply = '*',
    divide = '/',
    period = '.'
}

Before I show the TypeScript for our calculator, let’s set up the HTML page.

<!DOCTYPE html>
<head>
    <title>100 Days of TypeScript - Calculator</title>
</head>
<body>
    <table border="1">
        <th colspan="4"><input id="display"></input></th>
    </table>
    <script src="scripts/calculator.js"></script>
</body>

What we have here is an HTML page that shows a table with a header row, 4 columns wide, that will display the results of any calculations. I have also added a script tag to load the calculator script. You will notice that, although the source for the calculator TypeScript file is in the root folder, the src is pointing to the scripts folder. To get TypeScript to write to this folder, we need to adjust the tsconfig.json file. I have trimmed my tsconfig file right down to this.

{
  "compilerOptions": {
    "lib": [
      "DOM", "ES2015"
    ], 
    "outDir": "./scripts",
    "strict": true,
    "noUnusedLocals": true,
  }
}

There are two things of real interest in these entries. The outDir key is where we set our output directory; this is how I am writing the calculator.js file into the scripts directory. The lib entry is interesting as well because I have added a DOM entry there. When we specify entries in lib, we are telling TypeScript what libraries it needs to bring in, so entries such as ES2015 bring in the ECMA capabilities. One of the things we are going to want our calculator to do is to copy the input to the clipboard, which is a JavaScript operation on something called window.navigator. In order to access the navigator, we have to bring in the DOM library which allows us to perform interactions with the browser Document Object Model. What can be a little bit confusing is that you don’t need the DOM library to interact with other standard features such as the window document.

Before I add the calculator buttons to my table, there is one more piece of setting up I can do. I know that my table has an input field called display. I want to interact with this later on, so I am going to write a little helper function that will make my life easier when working with it. What I am going to do is create a value that will store a reference to the input. As I am going to bind to this value I am going to add a helper method that will lazily populate this reference when it is first accessed, and return the stored version in subsequent calls.

let displayElement: HTMLInputElement | null = null;
function getDisplay(): HTMLInputElement {
    if (!displayElement) {
        displayElement = <HTMLInputElement>document.getElementById('display');
    }
    return displayElement;
}

What this code is saying is that displayElement can either be of type HTMLInputElement, or it can be null to indicate we haven’t hooked it up to the display element yet. TypeScript is really useful in that we can strongly type our web page inputs so, what would have been an object in JavaScript can be constrained to the actual type. This is useful because it tells us what properties and operations we have available to us. In order to populate displayElement we use document.getElementById. This is a standard browser method that allows us to choose elements based on their id (this is set in the actual tag in the web page). Now, the return type of document.getElementById is object so we need to set it to the appropriate type using a technique called type casting. TypeScript offers a few different ways to cast an object but, in our case, we are using <> to specify the appropriate type.

Let’s add the rest of our table.

<tr>
    <td colspan="2"><input type="button" onclick="clearAll()" value="Clear" /></td>
    <td colspan="2"><input type="button" onclick="copyToClipboard()" value="Mem" /></td>
</tr>
<tr>
    <td><input type="button" value="1" onclick="display(1)"/> </td>
    <td><input type="button" value="2" onclick="display(2)"/> </td>
    <td><input type="button" value="3" onclick="display(3)"/> </td>
    <td><input type="button" value="/" onclick="display(Operator.divide)"/> </td>
 </tr>
 <tr>
    <td><input type="button" value="4" onclick="display(4)"/> </td>
    <td><input type="button" value="5" onclick="display(5)"/> </td>
    <td><input type="button" value="6" onclick="display(6)"/> </td>
    <td><input type="button" value="-" onclick="display(Operator.subtract)"/> </td>
 </tr>
 <tr>
    <td><input type="button" value="7" onclick="display(7)"/> </td>
    <td><input type="button" value="8" onclick="display(8)"/> </td>
    <td><input type="button" value="9" onclick="display(9)"/> </td>
    <td><input type="button" value="+" onclick="display(Operator.add)"/> </td>
 </tr>
 <tr>
    <td><input type="button" value="." onclick="display(Operator.period)"/> </td>
    <td><input type="button" value="0" onclick="display(0)"/> </td>
    <td><input type="button" value="=" onclick="solve()"/> </td>
    <td><input type="button" value="*" onclick="display(Operator.multiply)"/> </td>
 </tr>

Each button is wired up to one of four functions depending on what we are trying to do. Let’s start with the display function that is tied to the numbers and the operators we added to our enumeration earlier on.

function display(value: number | Operator): void {
    const htmlElement = getDisplay();
    htmlElement.value = htmlElement.value.trim() + value;
}

This function accepts either a number or one of the operators. I love the fact that TypeScript gives us union operators to say that values can be of one or another type using the |.

Inside the function, we get the reference to our input element using the function we wrote above. Once we have this element, we get the value from it and add the number or operator to it. I call the trim() operation on htmlElement.value, just in case the user has put a space at the end of the input.

If I want to clear the input, I can use the following method.

function clearAll(): void {
    const htmlElement = getDisplay();
    htmlElement.value = '';
}

This is very similar to our display function in that it gets the html input element (in fact, we’ll see that all of our functions will do this). Once it has the reference, it interacts directly with the value and sets it to an empty string.

You might think that the solve function would be complicated, parsing our input and performing calculations on it. The reality is, with the aid of a standard JavaScript function called eval, which evaluates the results of an input, this function is trivial.

function solve(): void {
    const htmlElement = getDisplay();
    const output = eval(htmlElement.value);
    htmlElement.value = output;
}

Finally, we move on to our code to copy the input onto the clipboard. As I mentioned earlier, we are going to make use of the navigator object, which required us to import the DOM library.

function copyToClipboard(): void {
    const htmlElement = getDisplay();
    navigator.clipboard.writeText(htmlElement.value);
}

You might remember that I said that the navigator object was in window.navigator. For convenience, our code normally doesn’t need to specify the window part so we can go directly to navigator.

Final note:

You might wonder why I chose to go with input type="button" rather than just using a button element. I chose the input route because people will be familiar with it and I don’t need the ability to set other content inside the button such as displaying an image.

Conclusion

That’s it. That’s our first web page, powered by TypeScript. I hope you are impressed with just how easy it is to hook TypeScript up to HTML. In Day 9, we are going to continue with our journey into the world of web development looking at creating a simple share reporting application.

100 Days of TypeScript (Day 7)

First of all, I’d like to apologise for the delay getting around to this post. There’s been a lot going on that’s got in the way but I haven’t forgotten about writing this series. In day 6, we learned how to use inheritance and abstract classes to show how we model “objects”. In this post, we are going to start looking into using arrays to manage multiple items.

What is an array?

We can think of an array as a handy way to create a collection of “things” that we can easily work with. Going back to my musical instrument example, we could think of the strings on a guitar as being an array of “strings” (musical strings here, rather than text strings). On a guitar, each string is a particular width depending on how high the tuning of that string is meant to be. Now, if we wanted to refer to these in our code, we could choose to create individual variables, e.g, string1, string2, and so on. This becomes very cumbersome to use and limits us when we have 7 string, 8 string, or even 12 string guitars.

With an array, we simply need a single array that we just add the individual strings into.

Declaring arrays

There are a number of different ways that we can create arrays. If we know the contents of our array upfront, an easy way of creating and populating our array is this.

const strings: number[] = [10, 13, 17, 26, 36, 46];

I have specified the type here, but this is not strictly necessary. We could leave out the number[] part and this would still create an array of numbers like the following.

const strings = [10, 13, 17, 26, 36, 46];

TypeScript is clever enough to know that this is an array of numbers so it won’t allow us to add a different type to this array.

Now, I did mention that there are other ways to declare an array. TypeScript also provides us with the ability to use something called a generic type to create an array. Don’t worry what a generic is for the moment, we will be covering generics in a lot more detail later on in this series. Anyway, an alternative way to declare the same populated array looks like this.

const genericString: Array<number> = [10, 13, 17, 26, 36, 46];

The Array<number> is the generic type for the array and is, functionally, identical to the original array declaration above.

Declaring empty arrays

We don’t always know what we want to put into our array. There are lots of situations where we want to add items into our array after we have declared them. If we are using the [] syntax for our array, then we would declare our array like this.

const emptyStrings: number[] = [];

If we want to use the Array<> syntax, we have two choices available to us. The first choice is to use.

const emptyGenericStrings: Array<number> = [];

Alternatively, as this is a type, we can use the new() syntax like this.

const emptyGenericStrings2: Array<number> = new Array<number>();

Adding elements to our array

Obviously, when we create an empty array (or even a pre-populated one in most cases), we want to be able to add entries into it whenever we need. No matter which way we created the array, whether using the Array<> syntax or as a [] type, we use exactly the same method to add an element into it. The keyword that we use is push and it looks like this.

emptyGenericStrings.push(30);

If we want to add more than one element at a time, we can do so with the same command.

emptyGenericStrings.push(40,50,60);

Whether we choose to add an entry at a time, or as multiple elements in one go, these elements are added at the end of our list. This means that after our first entry, our list array looks like this.

The array with a single item added.
Array with our first entry added

Now, if we add push another entry into our array, it would look like this.

Our array with a second pushed to the end
Array with two entries

Removing array entries

Over time, items become stale or unnecessary so we no longer need to keep them in our array. If we wanted to remove the very last entry, we use the pop command.

Suppose we started with this array.

Array with four elements
Array with 4 elements

When the pop command is used, we are left with the first three elements like this.

Array with 3 elements left after pop

Having seen some lovely diagrams showing what the pop operation does, how would we actually use it? It’s as simple as the following.

const popString = [ 30, 40, 50, 60 ];
popString.pop();

Well, that’s simple enough, but how do we remove a single item from elsewhere in the list? This is slightly more compicated. What we need to do is find the index of the record that we want to remove using the indexOf function and then use the splice function to remove this element. In this example, we are creating an array of strings and then we are going to remove the item2 entry.

const sliceStrings = [ "item1", "item2", "item3", "item4", "item5" ];
const index = sliceStrings.indexOf("item2");
sliceStrings.splice(index, 1);

The second parameter in the splice call tells the code how many items to remove. If we wanted to remove item2 and item3, we could use splice(index, 2) to achieve this.

Note: The splice function returns the items you have removed from the array.

Suppose we wanted to remove multiple entries from an array. How would we go about doing this? There are multiple ways to achieve this. For these examples, we are going to spice things up a bit and show that arrays work with more than basic types. Let’s create a guitar type that we can add to an array. The type consists of a model name, and the number of strings the guitar has.

interface Guitar {
    model: string,
    strings: number
}
let guitars: Guitar[] = [];

We are going to create a helper method to simplify adding entries into our array and then add some entries.

function guitar(model: string, strings: number = 6): Guitar {
    return { model: model, strings: strings};
}
guitars.push(guitar('Fender Stratocaster'));
guitars.push(guitar('Gibson Les Paul Anniversary'));
guitars.push(guitar('Fender Villager', 12));
guitars.push(guitar('Dreadnought 12 String Acoustic', 12));

What I want to do now is remove any guitar that doesn’t have six strings. The first method we could use is to filter the array so that it gives us only the entries we want. We have to copy the filtered version back onto the original array so that it overwrites it.

guitars = guitars.filter((gtr) => gtr.strings === 6);

Now, while we could do this, it’s not one that I really recommend. The alternate method is to iterate (loop) over the array and remove the relevant entries. To do this, we have to start at the last entry and work our way back to the first entry, splicing the ones we want to remove. If we start at the beginning of our array, we run the risk of missing entries that sit next to each other.

for (let i = guitars.length -1; i >= 0; i--) {
    if (guitars[i].strings !== 6) {
        guitars.splice(i, 1);
    }
}

It may look a little bit weird that we start at the length -1. Instinctively, we would think that we would start at the length but, for historical reasons, arrays actually start at position 0 rather than 1. This means that we have an offset here that we have to take into account, which is why this is -1.

Inserting items into an array

The last common array operation I want to touch on in this post is how to insert an item into an array at a set position, rather than adding it to the end. The ability to do this is straightforward. We are going to use the splice function, this time telling it to remove 0 elements. This function is very versatile because it gives us an extra parameter to specify the element we want to add. If I want to insert another guitar in the second position in the list, I simply do the following.

guitars.splice(1, 0, guitar('Ibanez Jem 777'));

Conclusion

So, there we have it. We have covered most of the basics about working with arrays in TypeScript. We know how to create both empty and populated arrays, as well as learning how to add and remove items from the array. In the next post, we are going to move away from working purely in the console and start working with TypeScript as a companion to web applications.

As always, the accompanying code is available in Github.

100 Days of TypeScript (Day 6)

On day 5, we looked at how to implement interfaces to say what behaviour a class can have. I said, at the end, that we were moving into the territory of doing inheritance. Today, we are going to look at how we can implement interfaces, inherit from classes and a whole lot more.

What is inheritance?

If you have never worked with an Object Oriented language before, the concept of inheritance might seem a little odd at first but it’s actually pretty straight forward. To explain inheritance, I am going to go back to an old favourite of mine, the guitar. I am going to demonstrate with a “pseudo class” structure, how to use inheritance. (A pseudo-class is one that demonstrates a class, but isn’t written in any particular language). To start with, I am going to look at the properties that a guitar might have.

  • Necks (typically one, but guitarists such as Jimmy Page sometimes used guitars with more than one neck)
    • A neck may have frets
  • Strings
  • Pickups (for electric guitars)
  • Pickup selector (for electric guitars)
  • Volume controls (for electric guitars)
  • Tone controls (for electric guitars)
  • A bridge (the bit that the strings go into in the body of the guitar)
  • Strap connectors
  • A body
  • A manufacturer
  • A make
  • Serial number
  • Sound hole (for acoustic / electro-acoustic guitars)
  • Headstock (the bit at the top of most guitars)
  • Tuners

That’s not an exhaustive list of all of the things that we can use to make a guitar, but it gives us a good starting point. Before I start creating my classes, I need to decide what is common and what is specialised; in other words, anything that all guitars share is a common feature, and things that are specific to a particular type of guitar are specialised. Anything that is common goes into something we call a base class; a base class is something we will inherit from that has properties and behaviours that are shared.

It is very tempting to jump in and say that the starting point here is a guitar, but I am going to take a step back. While I listed properties for a guitar, it is important to remember that a guitar belongs to a family of things we call musical instruments and there are certain features of a guitar that are common across all commercial musical instruments; if I were writing an application for a music shop, I would want to start with those features as the base for my guitars.

Musical Instruments representing the inheritance chain; the instruments are a piano, an electric bass guitar, an electric guitar and a violin with bow.
Musical Instruments as hierarchies

I will start with a MusicalInstrument pseudo class and put the features in there that are common.

Class MusicalInstrument
    Manufacturer
    Make
    SerialNumber
End Class

You might be surprised to see that I haven’t said what type of musical instrument it is that we are dealing with in there. The reason I haven’t done that is down to inheritance; I am going to use inheritance to say what type of instrument it is that I am dealing with so if I wanted to have a Piano class, I might look at that as being a type of Keyboard, which is a type of MusicalInstrument. This would give me something like this.

Class Keyboard InheritsFrom MusicalInstrument
    ... Features common to all keyboard type instruments
End Class

Class Piano InheritsFrom Keyboard
    ... Features that are specific to a piano
End Class

Going back to the guitar scenario, I might want to create my hierarchy like this.

Class Guitar InheritsFrom MusicalInstrument
    Neck
    Headstock
    Tuners
End Class

Class AcounsticGuitar InheritsFrom Guitar
    SoundHole
End Class

Class ElectricGuitar InheritsFrom Guitar
    Pickups
    VolumeControl
    ToneControls
End Class

I’m not going to add every property to these classes, but this should give you an idea as to what the inheritance chain should look like. What we see in all of this is that inheritance is about creating an object from a hierarchy.

Class inheritance with TypeScript

On day 5, I demonstrated how I can use implements to “inherit” from an interface (technically, we call this implementation rather than inheritance but people sometimes think of interface implementation as inheritance). I am now going to demonstrate how to inherit from classes. To make this interesting, I am going to start with the same validation interface that I implemented in the last post.

interface Validate {
  IsValid(): boolean;
}

If you remember, the last post demonstrated the minimum length validation and maximum length validation but there was code that was repeated between the two classes. What I want to do is create a base class that does all that is necessary for the common code. I am going to start with this code.

class LengthValidationBase implements Validate {
  constructor(protected text: string, protected length: number) {}
  IsValid(): boolean {
  }
}

This code will not compile because IsValid doesn’t return anything. I have two choices here. I can either return a default value or I can use “tricks” to avoid returning the value here. The trick that I am going to use is to make this class something called an abstract class. What this means is that this class cannot be created on its own; it must be inherited from, and the inherited classes can be instantiated.

By creating an abstract class, I am able to create an abstract method. What this is, is a piece of code that, effectively, says “I am not going to give you an implementation here, but anything that inherits from me must add its own implementation.” Unsurprisingly, the keyword to make a class or method abstract is, well it’s abstract. With this, my code now looks like this.

abstract class LengthValidationBase implements Validate {
  constructor(protected text: string, protected length: number) {}
  IsValid(): boolean {
    return this.CheckForValidity();
  }

  public Debug() {
      console.log(`Checking whether the length check of ${this.length} for ${this.text} is valid returns ${this.CheckForValidity()}`);
  }

  protected abstract CheckForValidity(): boolean;
}

There are a few things in my class here that I want to talk about. Let’s start with the constructor. In an earlier post, I talked about how I can declare class-level variables directly in the constructor signature. This is one of those really great features that TypeScript gives us that you won’t see in languages like C#. What we haven’t seen before, though, is this funny protected keyword. What does this mean?

If I want something to be visible only inside the class, I mark a method of field as private. This means that I cannot see this variable/method from outside the class. If I inherit from the class, I still can’t see that variable. If you are thinking that I need to see the values in text and length in my derived class (when we inherit from a class, we say that we have derived from the class), you would be correct. The way that we say that a method or function cannot be seen from outside the class, but can be seen from a derived class is to use the protected keyword.

The CheckForValidity method is interesting. This is an abstract method that I am going to call from the IsValid method, giving us the boolean return value that IsValid is expecting. You can see that this does not actually do anything – we can think of this as being a signature or contract that says “when you inherit from me, you must supply an implementation for this method”.

Note: You can only add abstract methods inside abstract classes. If your class isn’t marked as abstract, then you can’t create abstract methods in there.

Here’s a quick question. Do you think I can create a private abstract method? The answer to this is no, if I tried to do this, TypeScript would tell me that I cannot create a private abstract method. The message I would get is The “private” modifier cannot be used with the “abstract” modifier. When you think about it, this makes perfect sense. A private method cannot be seen outside the class, but an abstract method says that the code must be added in an inherited class.

Something you might be wondering about. Why have I added a Debug method? It’s not described in our interface, so why have I added one? I wanted to provide the ability to write out debug information about what the class is doing and, as the ability to debug doesn’t have anything to do with the validation interface. By using a backtick ` instead of an apostrophe ' in the console log, I am able to do something called string interpolation. This is the funny-looking syntax in the string where the values inside ${} are printed out directly.

Let’s revisit our minimum and maximum length validation. By using inheritance, I move from this.

class MinimumLengthValidation implements Validate {
    constructor(private text: string, private minimumLength: number) {}
    IsValid(): boolean {
        return this.text.length >= this.minimumLength;
    }
}

class MaximumLengthValidation implements Validate {
    constructor(private text: string, private maximumLength: number) {}
    IsValid(): boolean {
        return this.text.length <= this.maximumLength;
    }
}

to

class MaximumLengthValidation extends LengthValidationBase {
  protected CheckForValidity(): boolean {
    return this.text.length <= this.length;
  }
}

class MinimumLengthValidation extends LengthValidationBase {
  protected CheckForValidity(): boolean {
    return this.text.length >= this.length;
  }
}

It may not seem like I have removed a lot of code, but that’s not the main reason for doing inheritance. The main reason for inheritance is to remove code duplication. In the code example above, I only have to declare the constructor once. This is a simple and largely trivial example, but it means that any code I write that inherits from my base class results in exactly the same behaviour in building up the class. I have completely removed the IsValid code from my derived classes, by providing an implementation for my abstract method (note that abstract has been removed from the method name here because I am supplying the real code).

Testing the implementation

I am going to test the implementation of my code. To start with, I am going to use the same method to add the validation items that I did in the last post.

const validation: Validate[] = [];
validation.push(new MinimumLengthValidation('ABC12345', 10));
validation.push(new MinimumLengthValidation('ABC12345AB12345', 10));
validation.push(new MaximumLengthValidation('ABC12345', 10));
validation.push(new MaximumLengthValidation('ABC12345AB12345', 10));

We need to pay attention to the fact that I have created this array as an array of Validate instances. This is going to become important to us because, while I am looping over the validation examples here, I want to call the Debug method, but as this isn’t present in my Validate interface, I can’t do this directly.

validation.forEach((val: Validate) => {
    console.log(val.IsValid());
    // We want to call debug but we can't here.
    // val.Debug(); is not going to work
    // Do something clever here.
});

You see that bit where I say I want to do something clever here? What I want to do here is to do something called a cast. What a cast is, is a way to change one type into another. What I want to do here is to cast the Validate implementation into a LengthValidationBase class so that I can call Debug. To do this, I am going to write the following code, where I use the as keyword to say what I want to cast my class to.

const lengthValidation = val as LengthValidationBase;
lengthValidation.Debug();

In future posts, I am going to deal further with casting, because there are all sorts of cool things we can do with it – far more than we can cover in this one post. For the moment, I will leave you with what my code looks like right now.

validation.forEach((val: Validate) => {
    console.log(val.IsValid());
    // We want to call debug but we can't here.
    // val.Debug(); is not going to work
    const lengthValidation = val as LengthValidationBase;
    lengthValidation.Debug();
});

Conclusion

In this article, we have looked at what inheritance is, and how we can apply it with classes. We discussed making classes abstract and using the protected keyword. We also introduced the ability to cast one type to another. As always, the code for this article is available on Github.

100 days of TypeScript (Day 5)

On day 4 of our journey into TypeScript, we looked at how we could use interfaces to act as data types. As I am about to show you, that’s not all that interfaces can do. In this post, I am going to demonstrate how to use interfaces to set up types so that they must have certain behaviours. For the purposes of this post, I am going to create a simple interface to control validation.

Requirements

The requirements for the validation are going to be really straightforward.

  1. The validation will determine whether a string is greater than or equal to a minimum number of characters.
  2. The validation will determine whether a string is less than or equal to a maximum number of characters.
  3. The validation will use a single method called IsValid to determine whether or not the string is valid.

With these simple requirements in place, I am ready to start writing my code.

Before I start writing the code, I want to address something you might be wondering, namely, why have I written my requirements down? The answer to this is straightforward; as a professional developer, I like to know what it is that I am writing. I find that the act of writing requirements down is a great place for me to start solving the problem I am writing the code for.

The implementation

Okay, getting back to the code. One of my requirements was that I wanted a single method called IsValid that my validation code will use. This is where the interface comes in; interfaces do not have any implementation capabilities so I cannot write any actual logic in my interface, I can say what methods I want to use. This is the code for the interface.

interface Validate {
    IsValid(): boolean;
}

So, now I need to do something with the interface. To fulfil my requirements, I am going to create a class that validates whether or not the string is a minimum length and another class to determine whether or not the class is a maximum length. Both of these classes will use the interface; to do this, I need to use implements to say that the class implements the interface.

class MinimumLengthValidation implements Validate {
    constructor(private text: string, private minimumLength: number) {}
    IsValid(): boolean {
        return this.text.length >= this.minimumLength;
    }
}

You will probably notice that the constructor looks unusual. I have declared text and minimumLength in the signature of the constructor. By marking them as private, I have told TypeScript that I want these assigned here. Effectively this code is exactly the same as this.

class MinimumLengthValidation implements Validate {
    private text: string;
    private minimumLength: number;
    constructor(text: string, minimumLength: number) {
        this.text = text;
        this.minimumLength = minimumLength;
    }
    IsValid(): boolean {
        return this.text.length >= this.minimumLength;
    }
}

The maximum length validation looks remarkably similar to this code unsurprisingly.

class MaximumLengthValidation implements Validate {
    constructor(private text: string, private maximumLength: number) {}
    IsValid(): boolean {
        return this.text.length <= this.maximumLength;
    }
}

Testing the code

Having written the validation classes, I am ready to test them. I could write my code like this.

console.log(new MinimumLengthValidation('ABC12345', 10).IsValid()); // Should print false
console.log(new MinimumLengthValidation('ABC12345AB12345', 10).IsValid()); // Should print true
console.log(new MaximumLengthValidation('ABC12345', 10).IsValid()); // Should print true
console.log(new MaximumLengthValidation('ABC12345AB12345', 10).IsValid()); // Should print false

That doesn’t really demonstrate my validation, so let’s take a look at using the Validate interface. I am going to create an array of Validate items.

const validation: Validate[] = [];

What I am going to do now is push the same validation items from the little snippet above into the array.

validation.push(new MinimumLengthValidation('ABC12345', 10));
validation.push(new MinimumLengthValidation('ABC12345AB12345', 10));
validation.push(new MaximumLengthValidation('ABC12345', 10));
validation.push(new MaximumLengthValidation('ABC12345AB12345', 10));

With this in place, I am going to use a loop to work my way through the array and print out whether or not the validation has succeeded.

for (let index = 0; index < validation.length; index++) {
    console.log(validation[index].IsValid());
}

Coda

We have reached the end of using interfaces to describe what behaviours a class can have. We are starting to move into the territory of inheritance, one of the pillars of Object-Orientation. In the next post, I am going to go further into the world of inheritance and this is where we are really going to pick up the pace.

Thank you so much for reading. As always, the code behind this article is available on github.

100 days of TypeScript (Day 4)

Wow. Day 4 already and we have already covered a lot of material in our quest to go from zero to, well not something cliched, with TypeScript. In the last couple of posts, we delved into using classes in TypeScript so, in this post, I would like to take a bit of a diversion and introduce you to interfaces. Now, if you have come from a language such as C# or Java, you probably think that you won’t learn anything new about interfaces here but interfaces in TypeScript are really cool.

Interfaces as data

One of the things you probably noticed when we were looking at classes is that they can have behaviour. In other words, they aren’t just about data, they also give you the ability to add functionality to manipulate the data. That is incredibly useful but sometimes we want the ability to create something to represent just the data itself. We want to be able to create a type-safe representation of some useful piece of data. You have probably jumped ahead already and thought “I bet Pete’s going to say that interfaces can solve this for me”, and you would be right.

For this post, we are going to create something that represents an email message. We will be able to add recipients, a subject, and the message itself. I am going to start off by writing an interface to represent a single recipient. To create an interface, I change the class keyword for interface so my recipient will look just like this.

interface Recipient {
    email: string;
}

If I wanted to create an instance of a recipient, I could do something like this.

const recipient: Recipient = { email: 'peter@peter.com' };

Variable declarations

As a side note, you will have seen that I have been declaring variables using the const keyword but I have not actually explained where it comes from or what it means. When I started talking about TypeScript, I briefly covered that it was developed to compile to JavaScript. JavaScript has three ways of declaring variables, var, let and const. Originally, JavaScript only had one way, using var, but this was highly problematic. A little while back, let and const were introduced to be a better, less troublesome form of declaration.

Let’s take a look at why var is such an issue. The issue is down to something called block scope. Block scope refers to where a variable can be seen – it should only be visible in the block that it is being declared in so it would probably come as a surprise that the following bit of code lets me see data that it shouldn’t.

for (var i = 0; i < 10; i++) {
  console.log(i);
}
console.log(i); // Wait, why can I see i here?

What we are seeing in this code is var keyword not being covered by the block scope. This can lead to unfortunate side effects in more complicated code because the value becomes unpredictable.

Enter our heroes, let and const.

These were introduced to help us declare variables that respect block scope. We have two keywords because let allows us to declare a variable and then change the value later on, whereas const allows us to declare the variable but it cannot be changed.

Back to our interface

I have created a simple recipient interface and now I am ready to add one that covers the email itself. The email interface will consist of To, CC and BCC recipients lists, as well as the Subject and Message. If we think about things before we start writing code, we make our lives a lot easier so I am going to ensure that the person using the email interface can choose which of the recipients they want to add. As we have a strong type for our recipient, I am going to use a little TypeScript trick and say that the recipients can receive an array of recipients or the recipient can be null using | null.

interface Email {
    To: Recipient[] | null;
    CC: Recipient[] | null;
    BCC: Recipient[] | null;
    Subject: string;
    Message: string;
}

The syntax of Recipient[] | null reads that I want an array of Recipient items OR I want it to be null.

Now that I have my interface, I am going to create a simple function that accepts an Email and write it to the console.

function sendMessage(message: Email) {
    console.log(message);
}
sendMessage(email);

With all the bits and pieces discussed above, you will probably guess that the interface is going to be populated using the const keyword, just like this (this has to go before the sendMessage(email); line).

const email: Email = {
    To: [{
        email: 'bob@bob.com'
    }],
    CC: [{
        email: 'terry@terry.com'
    }, {
        email: 'chris@chris.com'
    }],
    BCC: null,
    Subject: 'This is my email',
    Message: 'This is the message inside my email'
};

Notice that I still had to add the BCC. Without this part, the “shape” of the object would not match the interface and TypeScript is really good at catching things like that.

A quick note about adding individual items to an array. In the recipient entries, each recipient was surrounded by { }. This is how we add an individual entry into the array, so adding multiple ones is simply a matter of separating these { } pairs with a comma.

We have reached the end of our introduction to interfaces. They can do so much more so, in the next post, I am going to show how classes and interfaces work together.

The code for this post can be found on github.

100 days of TypeScript (Day 3)

Welcome back to a series about learning TypeScript from basics through to some pretty advanced stuff. In Day 2, we learned how we can create a simple class using TypeScript. Today we are going to explore classes in more depth, showing how we can add our own constructors and how we can change whether or not code outside our class can see our fields.

Requirements

I have to admit that I’m a bit bored with writing a simple addition class so I am going to write a class that has a little bit more to it. Today, I am going to write a Point class. As a professional developer, I like to have an idea about what I want my class to do so I am going to give it the following requirements.

  1. The class will allow me to add an x and a y value to represent a single point.
  2. The class will provide me with an IsEmpty method so I can determine whether or not the x and y numbers aren’t set to 0,0.
  3. The only way to change the x and y value is through an Offset method.
  4. I will be able to add a Point to a point to get a new point.
  5. I can determine whether two points are equal (have the same coordinates) through an IsEqual method
  6. I will have a ToString method which will tell people using the class what the x and y values are.

The code for today’s exercise is available here. If you look at the code, you will see that I have created a tsconfig.json file. This is exactly the same file I created for Day 2 and Day 1 so you could copy the one you created previously or add a new one using

tsc --init

Getting started

In my day3.ts class, I am going to start by creating the basic class structure.

class Point {
}

A quick sidenote

You might wonder why you haven’t seen anything called object, but I keep talking about object-oriented programming. I have seen many complicated explanations but there is a really simple explanation. When we took about an object, we are talking about something that has been created by the application while it is running; a class is the template for the object so when we create a new instance of our class (instantiate the class is another term you might see), we have actually created an object. We can write a program with thousands of classes; they aren’t useful until we actually create instances from them.

The constructor

When we create an instance of any classes we are writing, you can think of it as we are constructing the class. To help us construct the instance, we have a special method called a constructor. This method is especially interesting because it helps us to get the instance into a start that we can use it, so it can have a large effect on what happens while the class is being instantiated. As this method is used to construct the instance, you can’t call it directly from TypeScript. The only thing that has direct interaction with it is the new keyword. So, what does a constructor look like?

In TypeScript, a constructor uses the constructor keyword like this.

constructor() {
}

Hint: If your constructor looks like this, you can remove it. If you don’t add a constructor to your class, one is automatically “added” for you that looks like this. You won’t see it in your code, but it is there. This is the reason I didn’t add a constructor to my code or Day 2.

In my requirements, I said that the class would allow me to add x and y values to represent the point. To do this, I am going to pass these values into the constructor like this.

constructor(x: number, y: number) {
}

With this in place, anywhere that I needed to create an instance of this class, I can create it like this.

class Point {
    constructor(x: number, y: number) {
    }
}
const point: Point = new Point(0, 0);

Note: As I have added a constructor with parameters, I no longer have access to the default constructor, so I am forced to use the constructor with parameters here.

I have passed values in, but I am not actually doing anything with them. The will not be available to any method that needs them because they are visible only to the constructory. I am going to fix this by adding a couple of fields to store these values. One of my requirements is that the only way to change the value of the fields is to use an Offset method so this suggests that I should not be able to access them directly from outside the class. To do this, I am going to introduce the private keyword. What private does is tell the compiler that this field will only be visible inside the class.

You are probably thinking that we cannot make everything private and that would be correct. By default, TypeScript makes things inside the class public but you can also explicitly set things to public.

Our private fields are going to look like this.

private x: number;
private y: number;

If you remember, in Day 2, I had to assign a default value to our fields when I created them. When I assign values to them in the constructor, the compiler is clever enough to know that I don’t have to assign default values. My constructor now looks like this.

constructor(x: number, y: number) {
    this.x = x;
    this.y = y;
}

Upcoming. In a future post, I will show you a handy trick of TypeScripts where I can declare a field in the signature of the constructor.

I am now going to address my other requirements. Let us start with the ability to check whether or not a point is empty. I have taken the decision here that an empty point is one where the x and y values are both set to 0.

public IsEmpty(): boolean {
    return this.x === 0 && this.y === 0;
}

The next method I am going to write checks whether two points are equal. Equality, in this case, is whether the x values in both points are the same and the y values are the same. As this code will run in an instance of the class, I only need to pass in the Point that I want to compare against.

public IsEqual(point: Point): boolean {
    return this.x === point.x && this.y === point.y;
}

With little increments of code like this, I can quickly add all the functionality that I need. The ability to offset my coordinates looks like this.

public Offset(x: number, y: number) {
    this.x = this.x + x;
    this.y = this.y + y;
}

Important note: There is a shorthand way to add another value to an existing one. If I use += in my code, I can change

this.x = this.x + x;

to

this.x += x;

Rather than going through the other methods, I will add the whole class here so you can see what the ToString and Add methods look like. By now, you should have a good idea about what these methods would probably do.

class Point {
    private x: number;
    private y: number;
    constructor(x: number, y: number) {
        this.x = x;
        this.y = y;
    }

    public IsEmpty(): boolean {
        return this.x === 0 && this.y === 0;
    }

    public IsEqual(point: Point): boolean {
        return this.x === point.x && this.y === point.y;
    }

    public Add(point: Point): Point {
        return new Point(point.x + this.x, point.y + this.y);
    }

    public ToString(): string {
        return 'X is ' + this.x + ' Y is ' + this.y;
    }

    public Offset(x: number, y: number): void {
        this.x += x;
        this.y += y;
    }
}

If I want to demonstrate this code in operation, I can write something like this.

const point: Point = new Point(0, 0);
console.log('Point is empty is ' + point.IsEmpty()); // Should be true
point.Offset(10, 20);
console.log('Point is empty is ' + point.IsEmpty()); // Should be false
const offsetPoint = new Point(10, 20);
console.log('Points are equal is ' + point.IsEqual(offsetPoint)); // Should be true
console.log('The offset is ' + point.Add(offsetPoint).ToString()); // X is 20 and Y is 40

We have reached the end of the code for Day 3. I appreciate that there is a lot to take in here, from creating a custom constructor, adding scope modifiers (public/private) and a little bit of alternate addition syntax. Please browse the code from github and, if you have any questions, don’t be afraid to ask. In day 4, I am going to introduce you to interfaces in TypeScript. If you have used interfaces in a language like C# or Java, the way that TypeScript lets you use them looks nothing short of miraculous.

100 days of TypeScript (Day 2)

In 100 days of TypeScript (Day 1), I created a basic TypeScript “application” where two numbers could be added together. This was intended to introduce you to get the pre-requisites in place for writing TypeScript code, as well as acquaint you with using the type system. I promised, at the end of the post, that I would rewrite this application to use the TypeScript class system instead.

Before I start writing the code, it is worth looking at what classes are, both in a general sense and then in how they relate to TypeScript/JavaScript.

Simply put, a class is something that allows us to group data and behaviour together into an object; this sounds complicated, but is actually really simple. The idea about using a class is that we put everything that we need to do in one place. Imagine that I want to group together everything to do with playing a guitar, so I create a guitar class. This has certain attributes (data) that applies to it such as the number of strings, the type of guitar it is, the manufacturer, model; possibly it has pickups, and so on. These could all be grouped together into one class called Guitar. It also has things that we can do to it, so for an electric guitar, we can choose which pickups we are using, we can adjust the tone controls or change the way the guitar is tuned. These behaviours or actions can all be added to the Guitar class. In other words, everything we need is grouped into one object.

Note: In a future post, I’ll demonstrate how we would break that Guitar class down into smaller classes that are much more specialist.

When TypeScript was first created, classes were something that were being considered for JavaScript, but which hadn’t actually been officially released. TypeScript allowed us to write code that used classes, and outputted code that JavaScript would use without having the class keyword; when classes were formally added to JavaScript, our TypeScript code could be recompiled to use them natively.

So, what does a class look like? For out addition class, we can start out with an empty definition that looks like this.

class Addition { }

This isn’t very useful as it stands, so I am going to add something called fields to represent the two numbers I want to add together. A field is just the name we give to the thing that holds the data for our class. Adding our fields looks like this.

class Addition { 
    number1: number = 0;
    number2: number = 0;
}

In the code here, I have added my two number fields and given them an initial value of 0. I had to give them an initial value because TypeScript complains there is no value if I don’t.

Before I get into the part where I create our add method, let’s take a look at how I put values into number1 and number2. In order to get to these two fields, I have to do something called instantiation. So, Addition is our class – to use it, we create an instance of the class (this is why it’s called instantiation). To create an instance of our class, we use a special keyword called new. It looks just like this.

const additionInstance = new Addition();

With this, I now have the ability to set the values of number1 and number2 directly.

additionInstance.number1 = 10;
additionInstance.number2 = 20;

Going back to the Addition class, I am now going to write the addition method (In object-orientation, you can think of a method as the name we give to a function).

public Add(): number {
    return this.number1 + this.number2;
}

In my Add method, I get access to the number1 and number2 fields with the special this keyword. What this does is give methods in the class access to other parts of the current instance of the class.

Now that I have completed the Add method, I can now call it from my instantiated code. The instantiation code now looks like this.

const additionInstance = new Addition();
additionInstance.number1 = 10;
additionInstance.number2 = 20;
console.log(additionInstance.Add());

And that’s it. We have created our first TypeScript class here. In the next tutorial, I will demonstrate how we can hide fields so they cannot be accessed outside the instance of the class and introduce constructors that help us to instantiate our classes with a bit more flair.

The code for this post can be found here.